In a nutshell
- ❄️ The science: Cold contracts wax, lowers adhesion, and turns it into brittle wax so it chips off cleanly—aim for cohesion over adhesion to protect the finish.
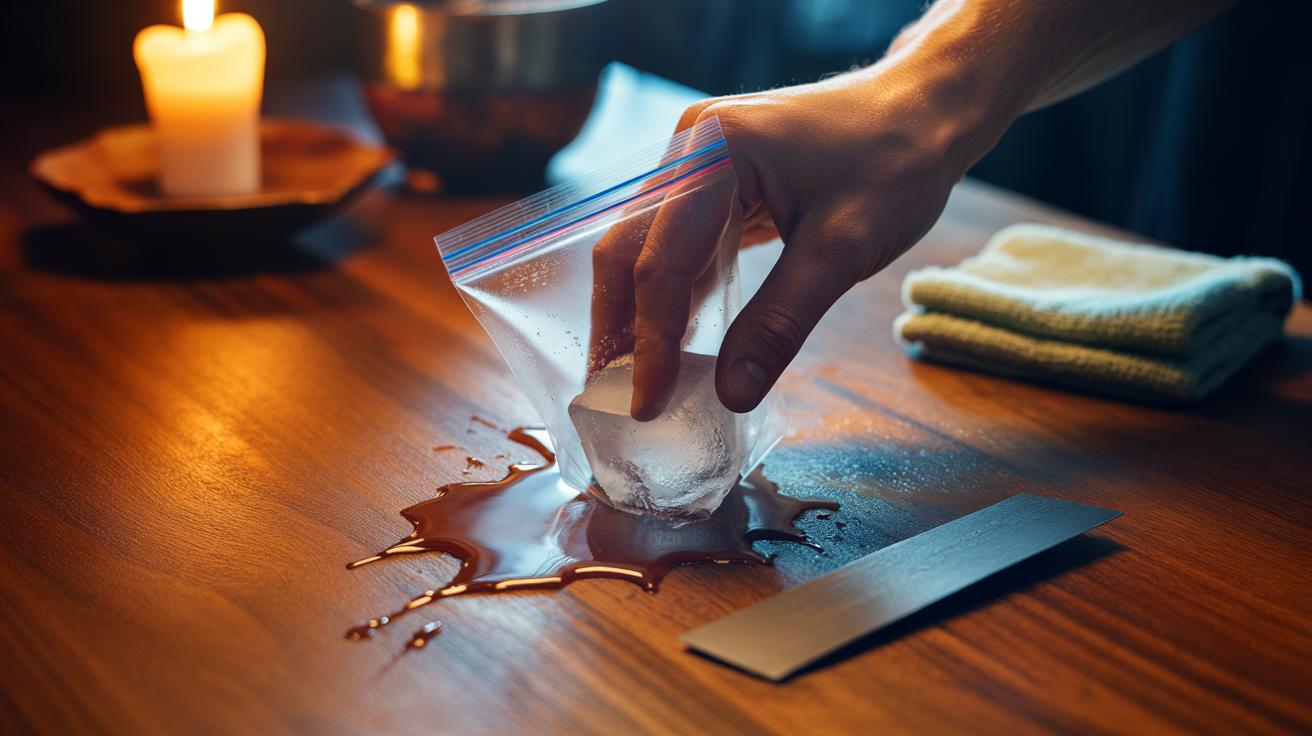
- 🧊 Method: Wrap an ice cube in a bag or film, chill for 30–60 seconds, then lift with a plastic card along the grain; collect flakes and use a touch of white spirit (patch-tested) only if residue remains.
- 🛠️ Tools and pitfalls: Avoid metal blades, keep cold brief and localised, watch condensation—especially on shellac—and use a wooden cocktail stick for grooves; repeat short chill cycles instead of forcing it.
- 🧴 Aftercare by finish: On lacquered or varnished wood, buff lightly; on oiled surfaces, add a fingertip of matching oil or beeswax; on unfinished timber, lift crumbs with low-tack tape and clear moisture rings with a quick warm-iron pass.
- ✅ Benefits: The ice cube rub is quick, quiet, and chemical-light, preserving patina and veneer integrity while delivering a professional-looking clean.
Stray candle drips on a sideboard or dining table can make a room look careless, and hasty scraping risks scarring the finish. A simple household trick solves it elegantly: the ice cube rub. By chilling the spill until it hardens, you reduce smearing and allow the wax to shear off cleanly with a gentle scrape. Cold turns pliable wax brittle and loosens its grip on timber, protecting both patina and grain. This method is quick, quiet, and chemical-light, ideal for antiques and modern veneers alike. Here’s how cold works its magic, how to do it safely, and what to use afterward to restore a flawless sheen.
Why Cold Works: The Science of Brittle Wax
Wax behaves differently at varying temperatures. At room warmth, candle wax remains slightly plastic, so it smears when pushed and clings to surface pores. Apply cold and the wax contracts, lowering its adhesion to the wood and shifting its structure towards a glassy, brittle state. With contraction, internal stresses form within the blob, making it prone to fracture under light pressure. The goal isn’t to freeze the wood, but to cool the wax enough that cohesion beats adhesion, so it lifts in crisp flakes rather than dragging across the finish.
This temperature effect also helps protect finishes. On lacquered or varnished timber, chilled wax detaches without dissolving or softening the coating, which can happen with aggressive solvents. On oiled surfaces, brittleness stops wax being pushed into the grain. The trick is a brief, targeted chill that hardens the wax but avoids condensation pooling. Short, localised cold equals clean removal and minimal risk of water marks on polished wood.
Step-by-Step: The Ice Cube Rub for Clean Removal
First, contain moisture. Place a single ice cube in a small food bag or wrap it in cling film, expelling air so the cold contacts the wax without dripping. Hold the wrapped ice on the spill for 30–60 seconds; for larger blobs, work in sections. You’ll see the wax go dull and firm. Test with a fingernail at the edge: if it chips rather than smears, you’re ready. Do not flood the area—condensation is the enemy of a pristine finish. Keep a lint-free cloth nearby to catch fragments before they scatter.
Use a plastic card or flexible scraper and nudge under the edge, moving with the grain. The wax should “pop” off in shards. For stubborn flecks, repeat the chill for a few seconds and lift again. Sweep up crumbs with the cloth, then give the area a light buff. If a faint film remains, a drop of white spirit on a cotton bud—tested on an inconspicuous spot—will cut residue without dulling the sheen.
Tools, Timing, and Common Pitfalls
Success comes down to the right kit and a light touch. Avoid metal blades, which can gouge edges and telegraph scratches across reflective finishes. Never pry with a knife on veneered furniture; the top layer is thin and unforgiving. Keep ice contact brief, particularly on shellac and French-polished pieces where water can mark. If wax sits in a groove, chill, flake, then lift the remnant with a wooden cocktail stick rather than forcing a card into tight corners. Repeat short cold cycles; piling on more pressure usually causes damage.
For quick reference, here’s a compact guide to essentials and cautions.
| Item | Purpose | Notes |
|---|---|---|
| Ice cube in bag/film | Chills wax without wetting wood | Press lightly; move as condensation forms |
| Plastic card/scraper | Lifts brittle wax | Work with the grain; avoid hard corners |
| Lint-free cloth | Collects flakes and buffs finish | Microfibre minimises swirl marks |
| White spirit (patch-tested) | Removes residual film | Use sparingly; never on shellac without testing |
Aftercare for Different Wood Finishes
Once the wax lifts, consider the finish. On lacquered or varnished surfaces, a gentle wipe with a barely damp microfibre cloth restores clarity; dry immediately. A pea-sized dab of furniture polish can even out sheen if the area looks flatter than its surroundings. On oiled wood, massage a fingertip of matching furniture oil or beeswax into the spot, then buff after ten minutes to blend. The aim is to match lustre, not create a glossy halo, so keep product use minimal and even.
For unfinished timber, chilling still works, but crumbs may sit in open pores. Use low-tack masking tape to lift residue after scraping, then wipe along the grain with a slightly damp cloth. Reserve light sanding for last resorts and feather the edges widely to avoid a visible patch. If a moisture ring appears, place a clean cotton cloth over it and pass a warm iron briefly to drive off trapped vapour, checking every few seconds. Patience preserves patina.
The ice cube rub is a small act of care that yields big results: swift, quiet, and kind to wood. By turning wax from gummy to brittle, you let physics do the heavy lifting while you protect cherished finishes from harsh solvents and risky blades. Keep a wrapped cube, a patient hand, and a plastic card, and most drips become a two-minute job with a professional finish. Less force, more control—your furniture will thank you. Which piece at home would benefit first from this cold, precise approach, and how might you adapt the technique to your particular finish and room conditions?
Did you like it?4.6/5 (21)