In a nutshell
- 🧪 Wax grips fibres as it cools; being a thermoplastic, it releases when cooled to brittleness then warmed gently — the cold-then-heat method prevents pushing liquid wax deeper.
- 🧊 Freeze first: apply an ice cube in a bag for 2–3 minutes, chip away brittle chunks with a dull tool, and vacuum shards to clear the bulk without damaging pile.
- 🥄 Heat to lift: place white paper over residue and glide a hot spoon (warmed in hot water, dried) to transfer softened wax, rotating to clean paper and reheating as needed.
- ⚠️ Safety and tools: favour targeted heat, avoid direct ironing, keep moisture minimal, patch-test mild detergent or isopropyl alcohol, and use a hose attachment—not a beater bar.
- 🎯 Troubleshooting: for dyes and oils, blot, don’t scrub; treat with washing-up liquid then a little alcohol, manage odours with bicarbonate, and be extra cautious with wool and natural fibres.
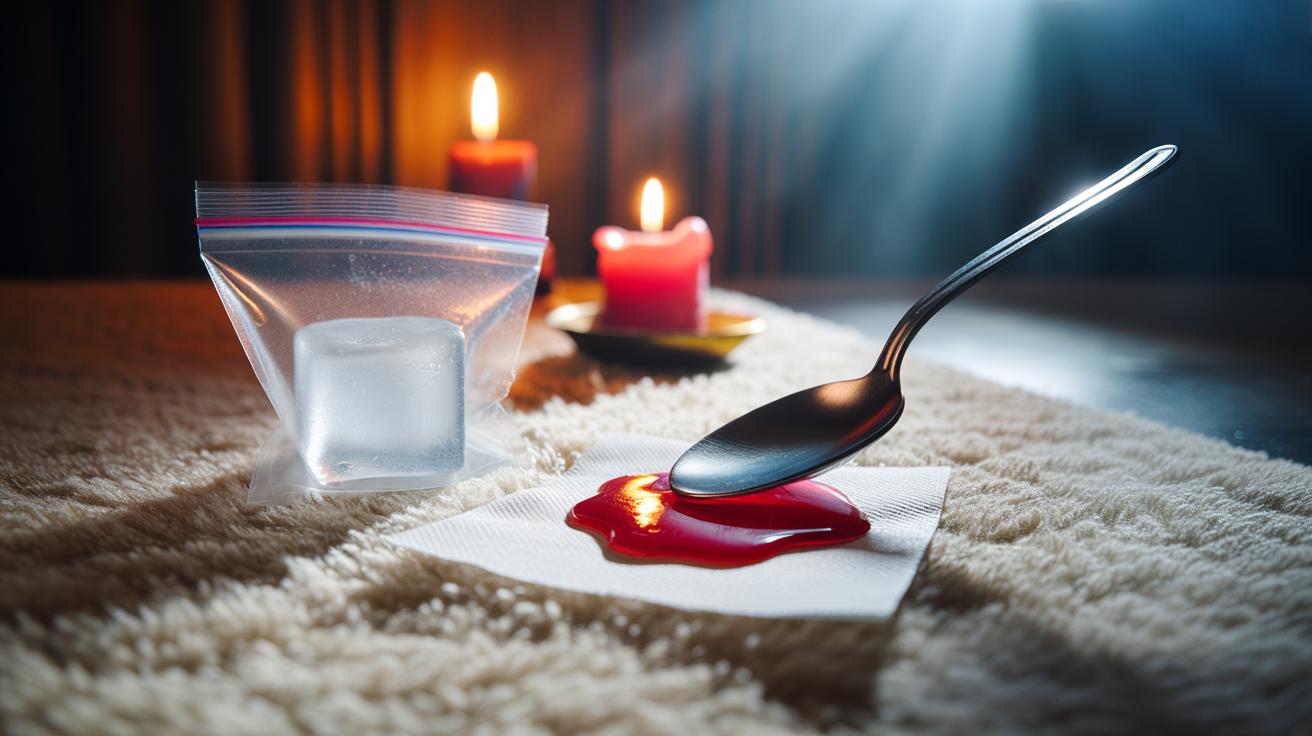
A toppled candle on a plush rug looks disastrous, but there’s a quick, clever fix hiding in plain sight: a hot spoon and an ice cube. This simple pairing uses science rather than harsh chemicals to release wax from carpet fibres. Cool the spill to make it brittle, then warm it just enough to draw it out cleanly. The technique is gentle, nearly free, and reliable on most synthetic and wool carpets. Act promptly, avoid aggressive scraping, and let temperature do the heavy lifting. Here’s how the cold-then-heat method works, why it’s so effective, and the best ways to finish the job without leaving behind stains, odours, or crushed pile.
Why Wax Bonds to Carpet — and How Temperature Frees It
Candle wax seeps into a carpet because melted wax behaves like a light oil: it flows, wicks between yarns, and then solidifies, gripping the fine textures of the pile. As it cools, it crystallises around individual strands, almost like a tiny cast. Once set, the wax feels immovable. Yet wax is a thermoplastic, meaning it changes shape with temperature. That’s where the ice cube + hot spoon trick earns its keep.
Cold first: icing the wax turns it brittle. The rigid structure contracts and loses grip, so the bulky top layer can be snapped off cleanly. Heat second: a hot spoon conducts controlled warmth into the remaining film, softening it just enough to transfer into an absorbent layer placed above. The key is control — harden for clean fracturing, then warm for clean lifting. Unlike blasting with a hairdryer or iron, the spoon gives precise, localised heat that won’t drive liquefied wax deeper into the backing.
The Cold-Then-Heat Method Step by Step
Start with the freeze. Put an ice cube in a small food bag or wrap it in a cloth to avoid wetting the fibres. Hold it on the wax for 2–3 minutes until the spill feels rock-hard. Using a dull butter knife or a bank card, chip away the crusted mass. Work from the outside in. Vacuum the shards so they don’t re-melt underfoot. Stop if fibres lift — you’re removing wax, not carpet.
Now the lift. Lay a plain white paper towel or unprinted brown paper over the residue. Warm a spoon in hot (not boiling) water, then dry it. Press the back of the spoon onto the paper, moving slowly over the spot. The wax softens and wicks up into the paper. Shift to a clean section of paper and reheat the spoon as needed. Repeat until no more wax transfers. For coloured wax, dab the area after lifting with a tiny amount of isopropyl alcohol or mild washing-up liquid solution, then blot with water.
Tools, Timings, and Safety for Best Results
Success rests on a few simple tools and sensible timings. Aim for short, controlled applications: quick icing to turn the spill brittle; gentle spoon heat to coax residue out. Do not use an iron directly on carpet — even low settings can gloss or distort fibres. Keep water near but never pour it on; you want warmth, not a soak. White absorbents prevent dye transfer, and a vacuum keeps fragments from tracking elsewhere.
| Item | Purpose | Notes |
|---|---|---|
| Ice cubes (in a bag) | Rapidly harden wax | Stops water marks; 2–3 minutes is typical |
| Stainless-steel spoon | Targeted, gentle heat | Warm in hot water; dry before use |
| White paper towels | Absorb softened wax | Move to fresh sections as they fill |
| Butter knife/card | Lift brittle chunks | Use light, shallow strokes |
| Mild detergent/alcohol | Treat dye residue | Patch-test on an inconspicuous spot |
| Vacuum | Collect flakes | Use hose, not beater bar |
Take extra care with wool and delicate blends. Limit heat exposure, and avoid scalding water. If you have underfloor heating, switch it off so you’re not fighting background warmth. Patience beats pressure; multiple light passes protect the pile and backing.
When the Hack Isn’t Enough: Stubborn Dyes and Delicate Fibres
Most spills yield to the cold-then-heat method, but some complications need finesse. Scented candles can carry oils and dyes that leave a faint tint after the wax is gone. In that case, blot with a teaspoon of washing-up liquid in a cup of warm water, then follow with a light dab of isopropyl alcohol for dye traces. Rinse by blotting with plain water and pat dry. Avoid scrubbing: it fuzzes the pile and spreads colour. For pastel dyes on pale wool, test every solution in a hidden corner first.
Natural fibre rugs — sisal, jute, seagrass — dislike moisture and heat. Limit both, stick to brief icing and mechanical lifting, and consider a professional if residue persists. If the carpet feels sticky after removal, sprinkle bicarbonate of soda, leave for an hour, and vacuum to tame odour and absorb leftover oils. When wax has penetrated to the backing on a high-pile or shag, a technician’s solvent extraction may be the safest route.
This quick, budget-friendly approach works because it respects the material: cool to fracture, warm to release, absorb to finish. The hot spoon offers precision that heavy tools can’t match, and the ice cube prevents smearing by locking wax in place before removal. Treat colour ghosts and lingering scents with gentle spot care, not force. With a steady hand you can restore texture, banish stains, and keep your carpet looking new without calling in the cavalry. What spill-prone corner of your home will you put to the test with the cold-then-heat trick next?
Did you like it?4.6/5 (29)