In a nutshell
- 🧪 The chemistry: a sodium bicarbonate paste at roughly pH 8–9 loosens oils, soap scum and biofilm, while fine crystals deliver a gentle abrasive action that lifts grime without scratching glazed tiles.
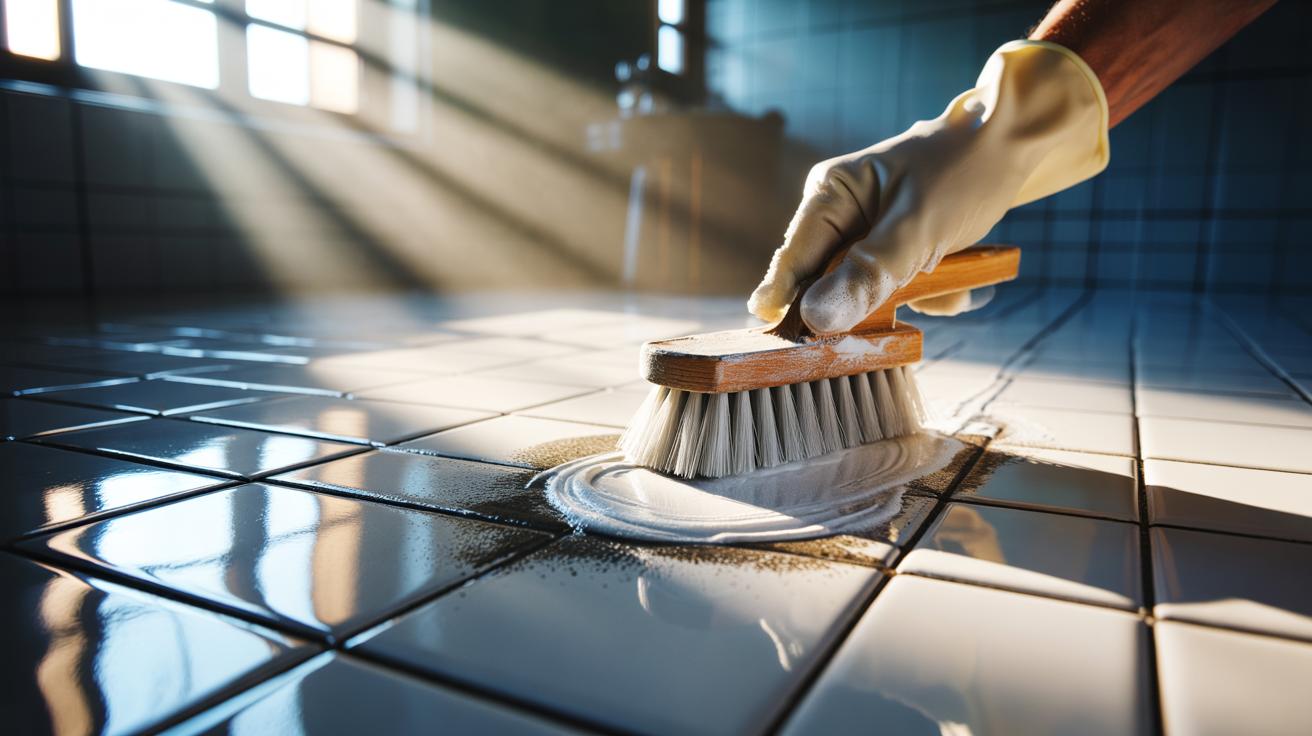
- 🧽 Method that works: mix 3:1 bicarb:water, dampen grout, spread paste, allow a dwell time of 5–10 minutes, then scrub with a stiff nylon brush, keeping the paste moist and finishing with a thorough warm-water rinse.
- 🔍 Stain strategy: ideal for everyday organic soils; for mildew shadowing add a spot of 3% hydrogen peroxide after rinsing, but do not mix chemicals; use targeted cleaners for rust/efflorescence, and consider regrouting or a grout colour sealer if stains are permanent.
- 🛠️ Practical tips: work in small sections (under 15 minutes), use warm water, avoid metal bristles, and handle limescale separately to prevent neutralising the alkaline paste and redepositing residues.
- 🛡️ Keep it bright: once dry, seal with a breathable penetrating sealer, then maintain with a pH‑neutral cleaner and periodic quick scrubs—avoiding harsh acids or heavy bleach cycles that degrade grout.
Grout lines set the tone of a tiled surface, and when they darken, the whole room looks tired. The simplest rescue is a time-honoured pairing: a stiff brush and a paste of household sodium bicarbonate—“bicarb” in British cupboards. This mildly alkaline scrub coaxes grime from porous cement, lifting deep-set stains without harsh fumes or costly kit. It is quiet chemistry backed by tactile elbow grease, ideal for bathrooms, kitchens, and busy hallways. Give the paste time to work and let the bristles do the rest. Done right, the method restores the pale, matte mortar lines that make tiles pop, and it slots neatly into a regular cleaning rhythm.
Why Alkaline Paste Works on Grout
Standard grout is a porous, cement-based material riddled with tiny channels that trap oils, soap scum, and biofilm. A bicarb paste, mixed thick with water, sits at roughly pH 8–9. That mild alkalinity helps to loosen greasy soils and break the grip of residue left by shower gels and cooking vapours. At the same time, bicarb crystals offer a fine, non-scratching abrasive action—firm enough to scour contamination, gentle enough for glazed ceramic and most porcelain. The paste’s viscosity stops it from running off vertical joints, keeping chemistry and pressure exactly where you need them.
Always patch-test on an inconspicuous joint first, especially with coloured or aged grout. Agitation matters as much as chemistry: a nylon grout brush flexes into the grout’s microtexture, whereas soft brushes skate over the top. Because bicarb is a buffering agent, it resists dramatic pH swings, making it kinder than strong alkalis that can weaken cement. That balance—mild pH uplift plus controlled abrasion—explains the bright, uniform results.
The Brush-and-Bicarb Method, Step by Step
Sweep or vacuum first so grit does not scratch. Lightly dampen grout with warm water to prevent the paste drying too quickly. Mix three parts bicarb to one part water to a spreadable, toothpaste-thick paste; add a drop of washing-up liquid if soils are particularly oily. Lay a bead along each line, then allow a dwell time of 5–10 minutes. Do not let the paste dry out—mist with water if needed. Scrub with a stiff nylon brush in short strokes, working across and along the joint to dislodge embedded grime.
Wipe away the grey slurry with a damp microfibre cloth and rinse well with warm water. For stubborn organic staining, repeat or spot-treat with 3% hydrogen peroxide after rinsing, then scrub lightly. Avoid vinegar on natural stone or recently installed cementitious grout; on glazed ceramic with cement grout it can be used separately, very dilute, to clear mineral haze—but never on the same surface at the same time as peroxide or bleach. Do not mix cleaning chemicals; separate steps and rinse thoroughly between products.
What Stains It Tackles—and When to Call Reinforcements
The bicarb-and-brush duo excels at everyday organic soils: body oils, soap residue, tracked-in dirt, and light tea or coffee marks. It also freshens light mould shadowing by breaking up the biofilm that feeds it. Where the paste struggles is with chemically distinct problems: rust deposits, tannin transfer from wood stain, polymer sealer blotches, or efflorescence from water ingress. In those scenarios, a targeted cleaner is safer and faster. Oxygen-based whiteners such as sodium percarbonate or plain hydrogen peroxide are effective against mildew staining without strong odour.
If grout has turned orange from iron-rich water, look to a dedicated rust remover approved for grout. For etched, permanently darkened, or crumbling joints, no cleaner will restore original colour; regrouting or applying a grout colour sealer is the long-term fix. If moisture keeps returning or mould regrows within days, investigate ventilation and leaks before chasing stains. Cleaning is only half the story; sources of contamination must be controlled to keep the lines bright.
Tools, Ratios, and Dwell Times
Good results come from small optimisations: the right brush stiffness, a paste that clings, and measured dwell time. Keep a dedicated grout brush; a toothbrush is often too soft and too narrow, leading to streaky lines. Work in sections you can scrub and rinse within 15 minutes. Use warm—not hot—water, which improves cleaning without accelerating drying. Where limescale is heavy, handle it separately after the alkaline clean using an appropriate, stone-safe descaler.
| Item | Specification | Notes |
|---|---|---|
| Bicarb paste | 3:1 (powder:water) | Thicker for vertical joints; add a drop of washing-up liquid for grease |
| Brush | Stiff nylon grout brush | Avoid metal bristles; they scratch glaze and shed filings |
| Dwell time | 5–10 minutes | Keep damp; re-mist to prevent drying |
| Booster | 3% hydrogen peroxide | Apply after rinsing; patch-test coloured grout |
| Rinse | Warm water, microfibre wipe | Change water frequently to avoid redepositing soils |
Seal grout once fully dry to slow future staining. Choose a breathable penetrating sealer for cementitious grout and reapply as directed—typically every 1–3 years. Day to day, stick to a pH-neutral cleaner and a microfibre mop; harsh acids and heavy bleach cycles shorten grout life and invite patchy colour.
The appeal of the brush-and-bicarb scrub is its honesty: a cheap, low-odour alkaline paste and focused bristle work that restore grout with minimal fuss. It is guided by simple chemistry—lift oils, disrupt biofilm, rinse clean—and protected by sensible habits like sealing and ventilation. What transforms results is patience: measured dwell time and thorough rinsing. Once you have the lines back to pale, the room looks newly tiled. Will you build a monthly ten-minute scrub into your routine, or will you experiment with a peroxide boost to see how white your grout can go?
Did you like it?4.6/5 (20)