In a nutshell
- 🌿 Pebble tray + evaporation raises local relative humidity, improving leaf turgor and reducing brown tips—especially for tropical foliage, orchids, and ferns.
- 🧰 Build it right: use a wide, shallow waterproof tray, washed inert pebbles, and keep water just below the top layer; prioritise surface area and keep pots elevated to prevent root rot.
- 📍 Smart placement: set under plant groupings for a shared microclimate, allow gentle airflow, avoid direct sun/drafts, and protect furniture; maintain a clear gap between water and pot base.
- 🧼 Routine care: top up every 1–3 days, rinse weekly, disinfect monthly, and switch to distilled water if mineral crusts appear; consistency keeps output steady and algae in check.
- 📈 Track results: use a hygrometer 10–30 cm above the tray—expect around a 5–10% RH boost; scale up with a wider tray or plant clustering, or pair with a humidifier if needed.
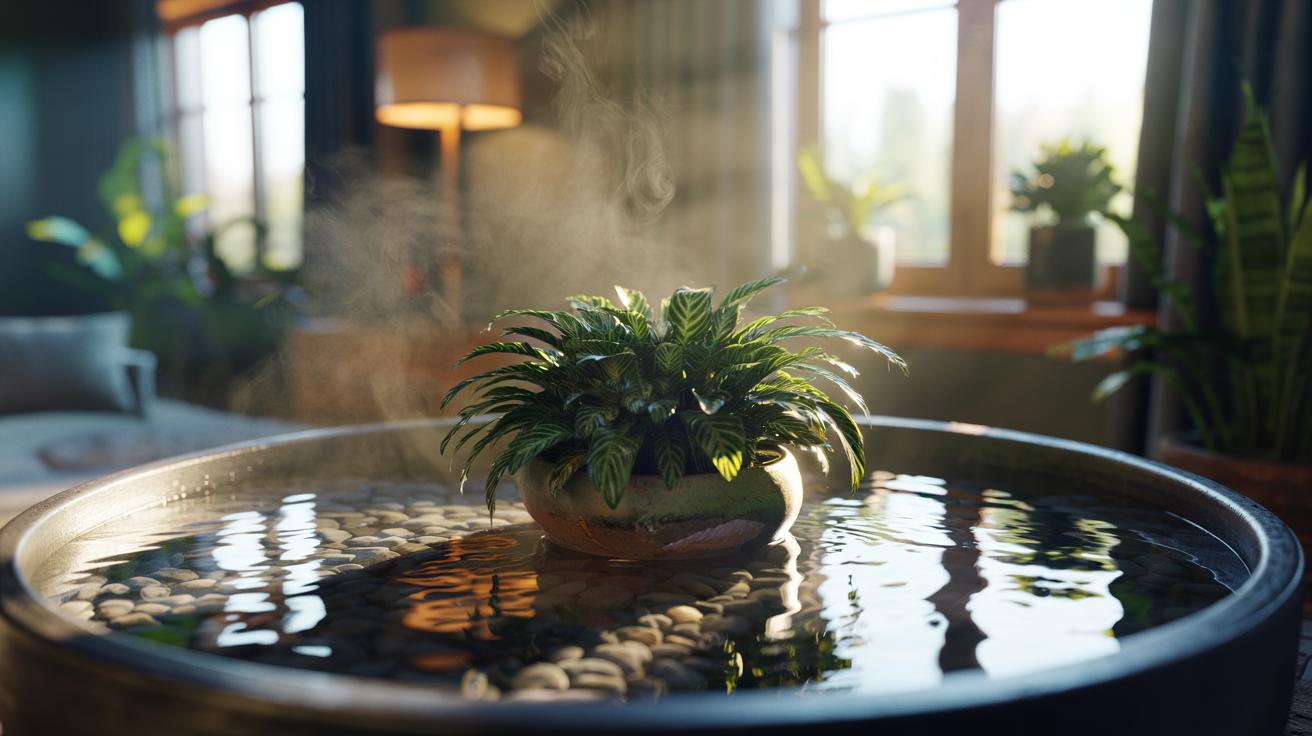
Dry, centrally heated air can leave houseplants thirsty for humidity, yet not every home suits a plug-in humidifier. The humble pebble tray offers a low-effort workaround: a shallow reservoir filled with stones and water that quietly increases moisture around leaves through evaporation. By elevating a pot above the waterline, you insulate roots while the air just above the tray becomes more humid, creating a targeted microclimate. This is a low-tech, low-cost upgrade that makes a noticeable difference for tropical foliage, orchids, and ferns. With a few simple materials and smart placement, you can stabilise leaf hydration, reduce crisping edges, and support steadier growth year-round.
Why Evaporation Raises Local Humidity
When water in a tray meets warmer room air, some molecules escape the surface and enter the atmosphere—a process known as evaporation. This consumes a small amount of heat and increases water vapour directly above the tray, lifting relative humidity (RH) in that boundary zone. Plants benefit because their leaves maintain a thin boundary layer of air where moisture exchange occurs. By enriching that immediate layer, leaves lose water more slowly, stomata behave more predictably, and hydration stress drops. It’s a subtle but steady effect that supports steadier transpiration without soaking soil.
Unlike misting, which spikes RH for minutes, a tray provides continuous output as long as the water surface remains exposed. Compared with powered humidifiers, the effect is smaller but more localised—ideal if you want to raise humidity for a cluster of plants without dampening an entire room. Expect better leaf turgor, fewer brown tips, and improved resilience in drying seasons.
Building a Reliable Pebble Tray
You need a shallow, waterproof tray; washed, inert pebbles or lava rock; and clean tap or distilled water. Fill the tray with stones, then add water until it sits just below the top layer—enough to expose a broad surface area without touching the pot base. Keep the pot perched on the stones, not in water, to avoid root rot. Choose materials that won’t leach salts or rust; ceramic saucers with a waterproof liner, stainless steel, or plastic boot trays all work. Rinse pebbles before first use to remove dust that could harbour algae.
Capacity matters. A larger surface area releases more vapour than extra depth, so go wide, not deep. Pair the tray with a snug plant grouping to amplify the effect as leaves transpire together. Refresh water before it fully evaporates to maintain consistency, and disinfect periodically. This simple routine keeps biofilm down and mineral crusts from forming on stones and pot rims.
| Component | Recommendation | Why It Matters |
|---|---|---|
| Tray size | At least 5–10 cm wider than pot | Maximises evaporation surface area |
| Pebble size | 8–20 mm, rounded or lava rock | Stable support, high void space for airflow |
| Water depth | 5–15 mm below pot base | Prevents wicking and root rot |
| Water top-up | Every 1–3 days (season dependent) | Keeps output steady |
| Cleaning | Rinse weekly; disinfect monthly | Limits algae, odour, and mineral build-up |
Positioning, Safety, and Daily Use
Place the tray directly under the plant or tight groupings, avoiding direct sun that could bake water dry too quickly. Gentle airflow helps distribute moisture; strong drafts disperse it away. Always ensure there is a visible gap between the water surface and pot base to prevent wicking. If using on wood or painted furniture, add a waterproof mat to protect against condensation rings. Where pets or small children are curious, choose a heavier ceramic saucer for stability.
Top up with clean water when levels drop below the upper stones. If you see white crusts, you’re dealing with mineral deposits: swap to distilled water or rainwater and scrub pebbles in a vinegar solution monthly. In winter heating season, consider doubling surface area with a wider tray rather than stacking depth. Do not rely on the tray for irrigation—water the potting mix as normal based on soil moisture, not tray levels.
Evidence and Expectations: What Results to Look For
Place a small hygrometer 10–30 cm above the tray to track gains. In typical UK homes, you may see a 5–10% RH rise near the foliage, sometimes more when plants are grouped. Results vary with room airflow, temperature, and tray width. Consistency beats intensity: a stable, local boost supports leaf hydration without soggy conditions. Sensitive species—calatheas, maidenhair ferns, orchids—often show crisper edges and slower leaf curl once the microclimate stabilises.
Expect water consumption to increase during dry, heated months and on sunny windowsills. If gains are modest, upscale to a broader tray, cluster more plants, or combine with a timed humidifier across the room. The pebble tray is not a cure-all for severe dryness, but it punches above its weight for cost and simplicity. Think of it as a steady background humidifier that never needs a socket.
A well-built pebble tray harnesses the physics of evaporation to elevate humidity where it matters most: right around your plants. With a wide, shallow reservoir, clean pebbles, and disciplined maintenance, you create a stable microclimate that improves leaf hydration and growth without risking waterlogged roots. Pair the tray with smart placement, gentle airflow, and routine cleaning to keep results consistent. This small intervention delivers quiet, measurable gains throughout the driest months. Which plant in your collection—and which corner of your home—will you transform first with a simple tray of stones and water?
Did you like it?4.3/5 (22)