In a nutshell
- 🌿 A cardboard barrier blocks light yet lets air and water through, starving weeds while feeding soil life; many gardeners halve weeding for an entire season.
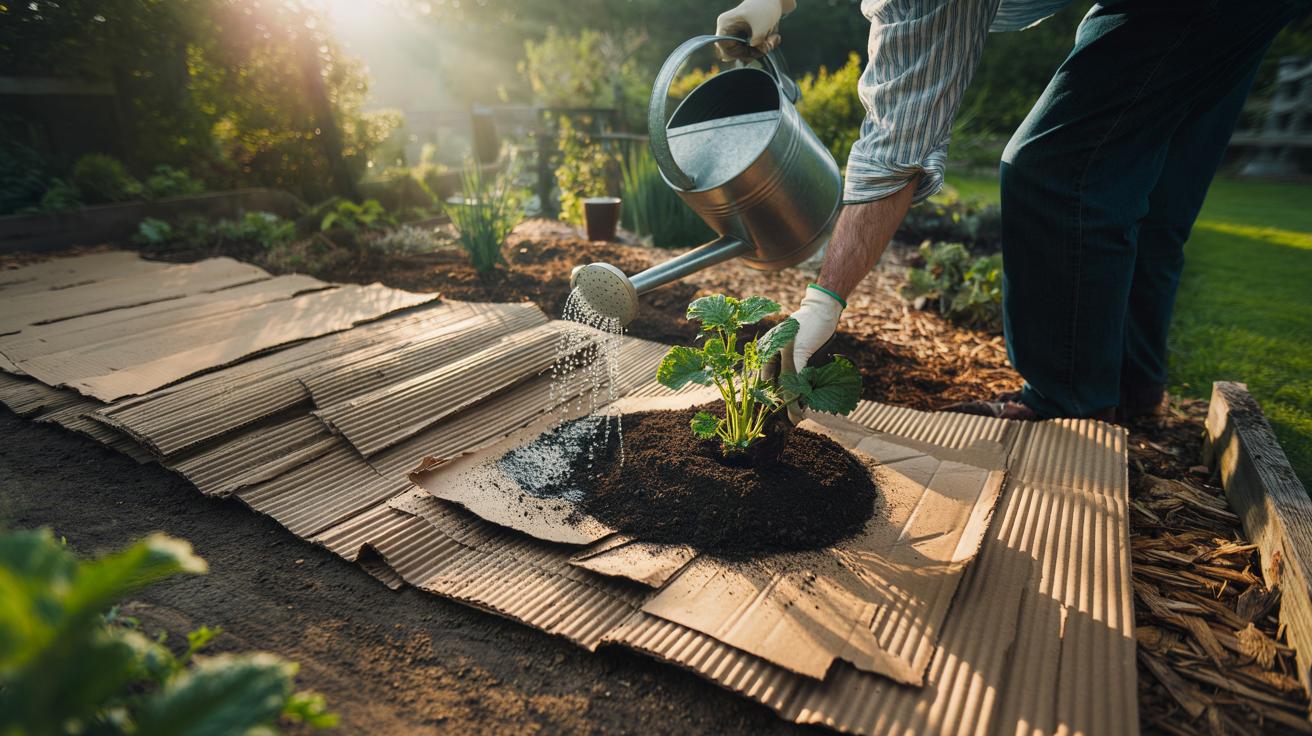
- 🧰 Use plain, uncoated corrugated boxes: remove tape, overlap by 10–15 cm, soak thoroughly, then add 5–8 cm mulch; plant via X-cuts or wait 4–6 weeks for sowing.
- ⚖️ Versus fabric/plastic, cardboard is breathable, cheap, and composts in 6–12 months; synthetics can cap soil and shed microplastics, though they last longer for paths.
- 🐛 Troubleshoot by using a double layer for bindweed, couch grass, or ground elder; extend sheets 30 cm beyond edges, manage slugs, and avoid waxed/glossy boxes.
- 🔄 It’s thrifty and circular: reuse delivery boxes, support no-dig and sheet mulching, prevent erosion, build friable soil, and refresh beds simply by topping up compost.
The fastest way to silence a weedy border isn’t a herbicide or a weekend of backbreaking hoeing. It’s a humble, reused box. Laid flat, a cardboard barrier suppresses light, starves weed seeds, and invites soil life to do the rest. Gardeners call it sheet mulching or no-dig gardening, and the method is disarmingly simple: one sheet, a soak with the hose, a cover of compost or mulch. In countless British plots, a single layer has cut weeding time by half for an entire season. It’s frugal, planet-friendly, and surprisingly elegant, turning clutter from deliveries into a soil-building tool that works while you make tea.
Why Cardboard Works as a Weed Barrier
Cardboard stops weeds by blocking the one thing they cannot live without: light. The sheet excludes sunlight, preventing germination and photosynthesis, yet its fibrous structure allows air and water to pass. That balance is the magic. It curbs growth on top while keeping the underground world alive. Corrugated boards use starch-based glues and break down slowly, so they act as a temporary blanket before becoming part of the soil. Worms love the carbon-rich fibres, dragging shreds below and improving soil structure with their burrows. The result is fewer weeds and more friable soil without spade work.
Because the material is biodegradable, it avoids the long-term problems associated with plastics. It smothers tough annuals immediately and stresses perennials long enough for you to lift crowns later, with far less regrowth. In a wet UK spring, the sheet also limits erosion and keeps nutrients where plants can use them.
Step-by-Step: Laying a Cardboard Barrier the Right Way
Gather plain, uncoated corrugated cardboard. Remove all tape, labels, and staples. Mow or scythe existing growth short, then water the area so the soil is damp. Lay sheets in a brickwork pattern with 10–15 cm overlaps to deny weeds any light. Avoid glossy, coloured, or waxed packaging; choose brown boxes. Thoroughly soak the cardboard in place until it darkens and sags—this helps it mould to the ground and begin bonding with the soil life beneath.
Top with 5–8 cm of compost, well-rotted manure, leaf mould, or wood chip, matching the mulch to your plants. For immediate planting, cut an X, fold back the flaps, and set transplants into a pocket of compost. For seed sowing, wait 4–6 weeks for partial breakdown or use compost-filled dibbles. Keep paths covered to prevent gaps at edges. In dry spells, water deeply so moisture reaches through the layers and doesn’t just bead on the mulch.
How It Compares to Fabric and Plastic Mulches
Gardeners often ask how cardboard stacks up against landscape fabric or polythene. The quick answer: it’s gentler on soil, cheaper, and easier to remove—because it composts. Where plastics can trap water and create anaerobic pockets, cardboard breathes. It shines for beds, borders, and veg plots that change annually. Fabrics and plastics hold an advantage in long-term paths or invasive-root zones but risk fraying, microplastics, and costly disposal. Cardboard is free or nearly so, and it doubles as a carbon input for your soil food web.
| Barrier | Weed Control | Soil Impact | Lifespan | Cost (UK) |
|---|---|---|---|---|
| Cardboard | High for annuals; good for many perennials | Breathable; feeds soil life | 6–12 months | Free–low |
| Landscape fabric | High if intact | Low airflow; can cap soil | 2–5 years | Medium |
| Black polythene | Very high while in place | Non-breathable; heat build-up | 1–3 seasons | Low–medium |
| Organic mulch alone | Moderate; needs topping up | Excellent if deep | Seasonal | Variable |
Troubleshooting, Safety, and Sustainability
Use a double layer for thugs like bindweed, couch grass, or ground elder, and extend sheets 30 cm beyond the bed edge. Check overlaps after storms; any sliver of light invites regrowth. If slugs surge under the mulch, deploy beer traps, encourage ground beetles with rough habitat, or switch to a coarser wood chip on paths. If the surface smells sour, it’s too wet and airless—pierce a few small holes and lift the mulch depth. Avoid freezer or waxed produce boxes that resist decay, and sidestep heavily inked, glossy cartons.
Modern corrugated boxes typically use soy or water-based inks and starch glues; remove plastic tape to keep microplastics out of beds. Tear large sheets slightly to help water infiltration on slopes. For wildlife, leave some uncovered margins and avoid sealing hedgehog routes with low, continuous barriers. When the cardboard is mostly gone, top up with fresh compost and repeat. Your “waste” becomes a renewable input, turning the no-dig cycle into a reliable rhythm.
A single, well-laid sheet of cardboard can choke off weeds, build structure, and gift you hours back on the weekend. It’s thrifty, circular, and aligns with the no-dig ethos that’s reshaping British gardening. By working with soil ecology, not against it, you reduce disturbance and invite resilience. Whether you’re reclaiming a scruffy lawn corner or resetting a perennial border, the method scales neatly and costs next to nothing. Will your next delivery box become the season’s most effective tool—and how might you adapt the technique to match your own garden’s quirks and microclimates?
Did you like it?4.5/5 (24)