In a nutshell
- 🟡 Causes & suitability: Yellowing often comes from dark polish, smoking, or chlorine; use the paste on healthy nails only and avoid if infection is suspected.
- 🧪 How it works: Citric acid loosens stains and chelates metals while fine salt provides micro‑abrasion, smoothing the surface for a brighter look.
- ⏱️ Quick method: Mix 2 tsp fine sea salt with 1–1.5 tsp lemon juice, massage 60–90 seconds, keep total contact 2–3 minutes, then rinse and apply oil.
- ⚠️ Safety first: Avoid broken skin and post‑gel thinning; limit to 1–2× weekly, stop if stinging occurs, and seek advice for thick, crumbly, or persistent yellow nails.
- 🔄 Alternatives & prevention: Try bicarbonate paste, brief 3% hydrogen peroxide soaks, or violet‑tinted fillers; protect with base coats, sunscreen, and daily oils.
Your nails can betray a season of dark polish, nicotine, or chlorinated swims, developing a stubborn yellow cast that looks older than it is. A quick, cost‑effective remedy sits in most kitchens: a simple paste of salt and lemon. This home technique is prized because it works fast, is easy to control, and avoids harsh solvents. The mild acid in lemon tackles stains while fine salt lifts residue from the nail’s surface. Used correctly, you can see a brighter nail plate in minutes. Below, discover how the chemistry works, how to apply the paste safely, and when to consider alternatives if discolouration signals something more than polish buildup.
Why Nails Yellow and When Natural Bleaching Helps
Yellowing often follows repeated use of highly pigmented varnishes, especially reds and blues, which leave dye molecules clinging to keratin. Lifestyle factors such as smoking, tanning products, and pool chemicals also contribute by depositing chromophores that shift the nail’s perceived colour. In these cases, a topical brightening approach can help. If the nail is thickened, crumbly, painful, or lifting, do not attempt cosmetic bleaching; consult a pharmacist or GP to rule out fungal infection or psoriasis. For polish and surface stains, though, a gentle kitchen‑cupboard method can lift residue without damaging the plate when applied with care and limited contact time.
Natural bleaching suits healthy nails that are smooth, intact, and free of cuts. The goal is to dislodge surface pigments and lightly refine the outer layers, not to strip deeply. Fresh lemon juice provides a mild acid that loosens stains, while fine sea salt adds controlled abrasion. The pairing is effective because it acts quickly—ideal for a pre‑event tidy—yet it is simple to rinse, neutralise, and follow with moisture. Short, supervised application beats long soaks every time.
The Science Behind Salt + Lemon Paste
Lemon juice contains citric acid, a fruit acid that chelates metal ions and helps break bonds between dye molecules and keratin. Lowering surface pH also swells the outer nail layers slightly, allowing superficial stains to release. Fine salt acts as a micro‑abrasive: particles glide over ridges, lifting oxidised residues without the harsher bite of files or pumice. Together, the slurry creates a brief, controlled polish that brightens the topmost microns of the nail in a couple of minutes.
What you see as “whitening” is actually stain removal plus light scatter from a smoother surface. The key variables are particle size (use fine, not coarse, crystals), contact time (aim for 2–3 minutes), and pressure (feather‑light). Pressure, not potency, causes most damage. Because citric acid is weaker than salon peels, it offers a forgiving margin—provided you avoid open skin and do not repeat more than twice a week. Finish with oil to reseal and counter any temporary dryness.
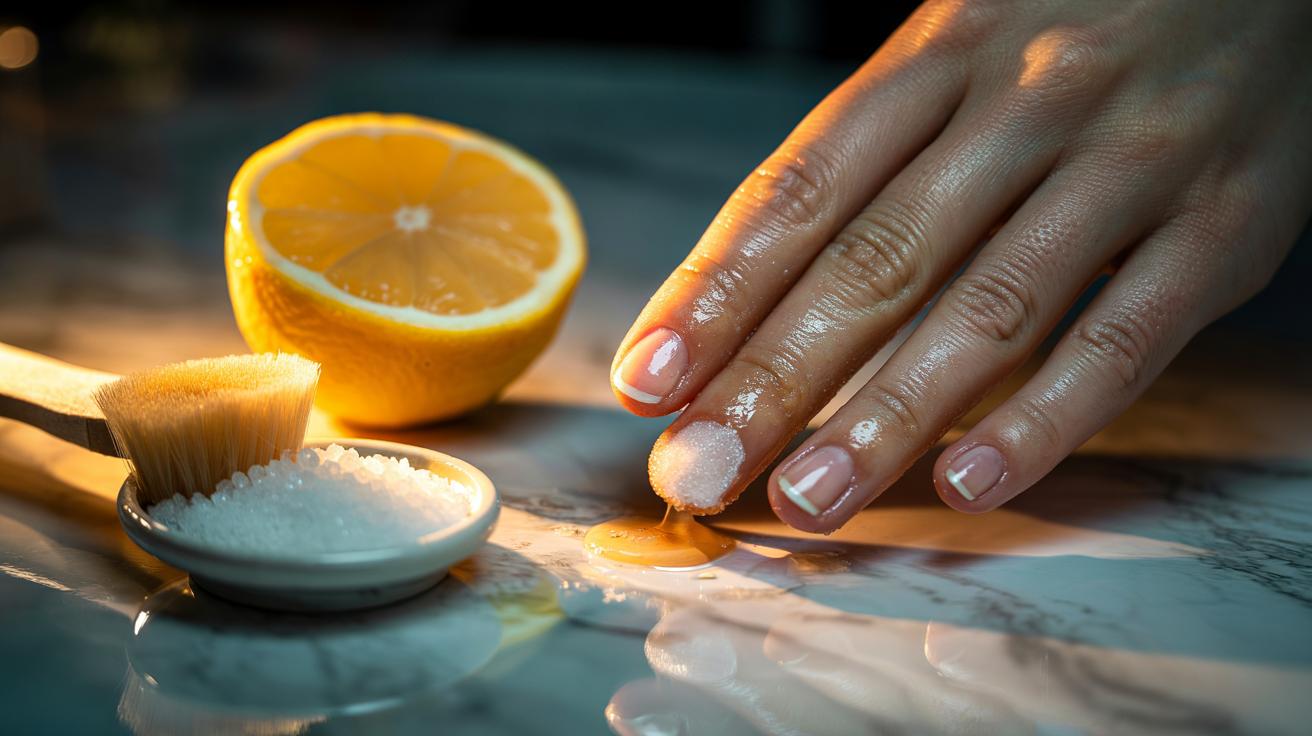
Step-By-Step: Make and Use the Paste in Minutes
Start with clean, polish‑free nails. Mix 2 teaspoons of fine sea salt with 1–1.5 teaspoons of freshly squeezed lemon juice until you have a spreadable paste. Optional: add 3–4 drops of olive oil for slip. Apply a pea‑sized amount to each nail. Using a soft brush or fingertip, massage in tiny circles for 60–90 seconds per hand. Leave the paste to sit for a further 1–2 minutes, then rinse thoroughly with lukewarm water and a mild soap. Pat dry and massage in cuticle oil, then a rich hand cream to restore suppleness.
Stop immediately if you feel stinging or see redness. Keep the paste off hangnails and broken skin. One session often lifts recent stains; older discolouration may need two sessions spaced three days apart. To prevent recurrence, wear a base coat under dark colours, rotate shades, and give nails a polish‑free day weekly. A soft nail buffer may be used lightly after rinsing to enhance shine—no more than a few passes to avoid thinning.
| Item | Amount/Timing | Purpose | Notes |
|---|---|---|---|
| Fine sea salt | 2 tsp | Gentle abrasion | Choose fine, uniform crystals |
| Fresh lemon juice | 1–1.5 tsp | Mild acid/chelation | Strain pulp for smoother paste |
| Contact time | 2–3 minutes total | Limits dryness | Do not exceed 5 minutes |
| Frequency | 1–2× weekly | Maintenance | Space sessions by 72 hours |
Safety, Limits, and Smart Alternatives
Natural does not mean consequence‑free. Do not use on inflamed cuticles, split skin, or suspected infections. Avoid after gel removal when the plate may be thinned. If nails feel tight afterward, skip active formulas for a day and feed with jojoba oil or squalane. Chronic yellowing unrelated to polish may signal fungal issues, diabetes, or medication effects; persistent changes deserve professional assessment. Smokers may see slower results because nicotine binds more stubbornly to keratin.
Prefer a different route? Mild bicarbonate of soda and water paste (pH‑buffered) can brighten without acidity. A brief 3% hydrogen peroxide soak (1–2 minutes) is another option, though it can dry nails; follow with oil. For cosmetic quick fixes, try violet‑tinted ridge fillers that neutralise yellow visually. Any method that thins the nail is too much. The aim is strategic, gentle stain release, then long‑term prevention through base coats, sunscreen on hands, and consistent moisture.
Used sparingly and sensibly, a salt + lemon paste can give yellowed nails a fresher look in a single tea break. The secret is short contact, light touch, and diligent aftercare so brightness lasts beyond the moment. Build protective habits—base coats, regular oiling, and breaks from dark varnish—to reduce future staining. If results plateau or nails show signs of stress, switch to buffering, tinted treatments, or seek expert advice. What’s your plan for restoring your nails’ natural clarity this week, and which step will you start with first?
Did you like it?4.3/5 (22)