In a nutshell
- 💇♀️ Upside-down blow-dry harnesses gravity to create natural root lift, directing airflow from roots to ends for smooth, lasting volume.
- 🛠️ Follow a step-by-step: prep with heat protectant and light volumiser, rough-dry inverted to 70–80% at the roots, then refine upright with a round brush and a cool shot.
- 🔥 Use high airflow on medium heat with a concentrator nozzle; choose brush size to control bend, and prioritise drying the scalp area before the ends.
- ⚠️ Avoid common mistakes: skipping heat protectant, over-drying ends, misdirecting airflow, and product overload that crushes volume.
- 📋 Tailor settings by hair type—fine, wavy, coarse, or curly—with targeted attachments and timing to lock in lift without frizz.
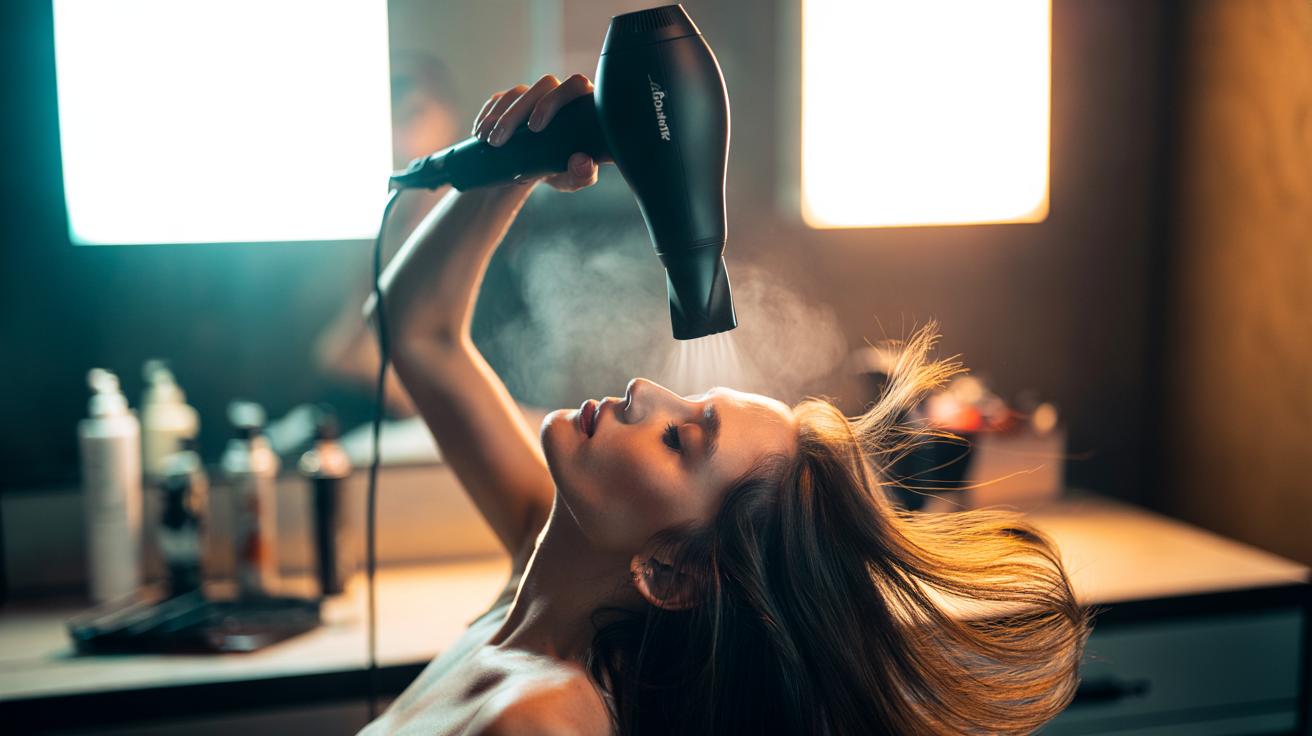
Salon pros have a deceptively simple secret for big, long-lasting hair: the upside-down blow-dry. By flipping your head and letting gravity do the heavy lifting, you can coax impressive root height without complicated gadgets. It is a technique that blends smart airflow with deliberate tension so strands swell with controlled lift rather than fluffy frizz. Heat protectant, a targeted nozzle, and a cool shot are your best allies, while timing is everything. Dry the roots first; ends follow for a polished finish that survives the commute and the drizzle. Here’s how hairdressers translate this editorial trick into a reliable, at-home routine.
What Is the Upside-Down Blow-Dry?
The upside-down blow-dry reverses your usual approach: flip your head forward so roots stand away from the scalp, then direct air from roots to ends. This harnesses gravity to generate natural root lift while smoothing the cuticle for shine. By angling the nozzle down the hair shaft, you compress and align the outer layer, reducing frizz and boosting reflection. Airflow direction matters more than raw heat, so prioritise high airflow on a moderate temperature. Think of it as building scaffolding at the base before refining the silhouette.
Pros rough-dry to about 70–80% dry in this inverted position, focusing at the scalp where hair is densest and slowest to dry. Once lift is set, they section the hair upright, then refine with a round brush to shape ends and add polish. A brief cool shot fixes the new architecture. The result is controlled volume that doesn’t collapse at the crown, with movement through the lengths rather than puffy bulk.
Step-By-Step Technique for Salon Volume
Prep clean, towel-dried hair with a light volumising mousse or spray at the roots and a heat protectant through the mid-lengths. Tip your head forward and use a dryer with a concentrator nozzle on high airflow, medium heat. Aim the nozzle from scalp to ends, keeping 5–8 cm distance. Always keep the airflow traveling downward along the cuticle to prevent fuzz. Use your fingers like a comb to lift and stretch sections while you dry the roots until they feel mostly dry to the touch.
Stand upright and create horizontal sections at the crown. With a 35–45 mm round brush, elevate each section to 90 degrees from the scalp and roll the brush to build tension. Direct heat at the base for several seconds, then glide to the ends for a bevel or bend. Lock each section with a cool shot for 5–10 seconds to set the lift. Finish by parting as desired, then mist a lightweight hairspray or texturising spray under the top layer for hold that feels airy, not stiff.
Tools, Heat Settings, and Timing
Choosing the right kit determines whether your volume holds or fizzles. A dryer with at least 1,800 watts, a slim concentrator nozzle, and a reliable cool shot is ideal. Brush size shapes the outcome: smaller barrels build tighter bend; larger barrels smooth with softer curves. Use higher airflow to move water, not higher heat to bully it. As a rule, pre-dry upside down until roots are nearly dry, then switch upright to refine. Below is a quick reference for hair types and settings:
| Hair Type | Best Attachment | Heat | Notes |
|---|---|---|---|
| Fine/Straight | Concentrator | Low–Medium | High airflow; avoid over-drying ends; use light mousse. |
| Medium/Wavy | Concentrator | Medium | Root spray, then brush polish; cool-shot each section. |
| Thick/Coarse | Concentrator | Medium–High (then Medium) | Pre-dry to 80%, then brush with strong tension. |
| Curly/Coily | Diffuser | Low–Medium | Scrunch at roots upside down; avoid disturbing curl clumps. |
Timing is your safety net: spend most of it at the roots, not the ends. When strands feel warm, they’re moldable; when cool, they’re set. Finishing with a pea-sized serum only on the tips preserves lift while adding polish.
Common Mistakes and Pro Fixes
Skipping protectant is the quickest route to dullness. Always mist a heat protectant before any dryer touches your hair. Another frequent error: blasting the ends while roots stay damp, which makes styles collapse. Prioritise roots; ends will follow with far less effort. If frizz shows up, check airflow direction and brush tension—air should glide down the shaft as the brush stretches hair taut. Product overload can also weigh down lift, so keep stylers light and targeted.
For persistent flat crowns, try “over-direction”: dry each crown section toward the opposite side, then flip it back to create instant height. Use small, duckbill clips to clip cooled root sections vertically for five minutes to reinforce lift without heat. If hair is porous or coloured, switch to medium heat with a slower, more deliberate pass and extend the cool shot. A final tip from session stylists: don’t establish your parting until after drying; styling off-part then setting it yields a fuller finish.
With a smart upside-down blow-dry, you create structure at the roots and polish at the ends, mimicking the choreography of a salon appointment in your bathroom. The combination of gravity, tension, and directional airflow gives a buoyant silhouette that lasts through the day without feeling lacquered. Keep products lightweight, commit to the cool shot, and respect timing at the scalp. Once you master the order—roots first, ends last—you’ll spend less time, win more volume. Which step are you most curious to tweak first: product prep, heat and airflow, or the brush work that seals the shape?
Did you like it?4.4/5 (22)