In a nutshell
- 💄 Use a bobby pin as a micro-stamp for a precise, natural-looking ombre lip, placing depth at the inner third and cupid’s bow for symmetry and control.
- 🧭 Follow the pro-backed steps: prep and line softly, stamp (don’t drag) deeper shade with the pin, blend outward, then add a lighter outer tone and set edges for longevity.
- 🎨 Choose smart pairings: keep the centre shade 1–2 tones deeper in the same undertone; creams and satins blend best, with optional gloss only at the centre for volume.
- 🧼 Prioritise hygiene and safety: clean and alcohol-wipe the pin, avoid rusted or sharp tips, work with light pressure, and use palettes for shared products to prevent contamination.
- ♻️ Enjoy practical perks: fast, affordable, portable technique that reduces single-use applicators while delivering a tidy, long-wear gradient suitable for day-to-night looks.
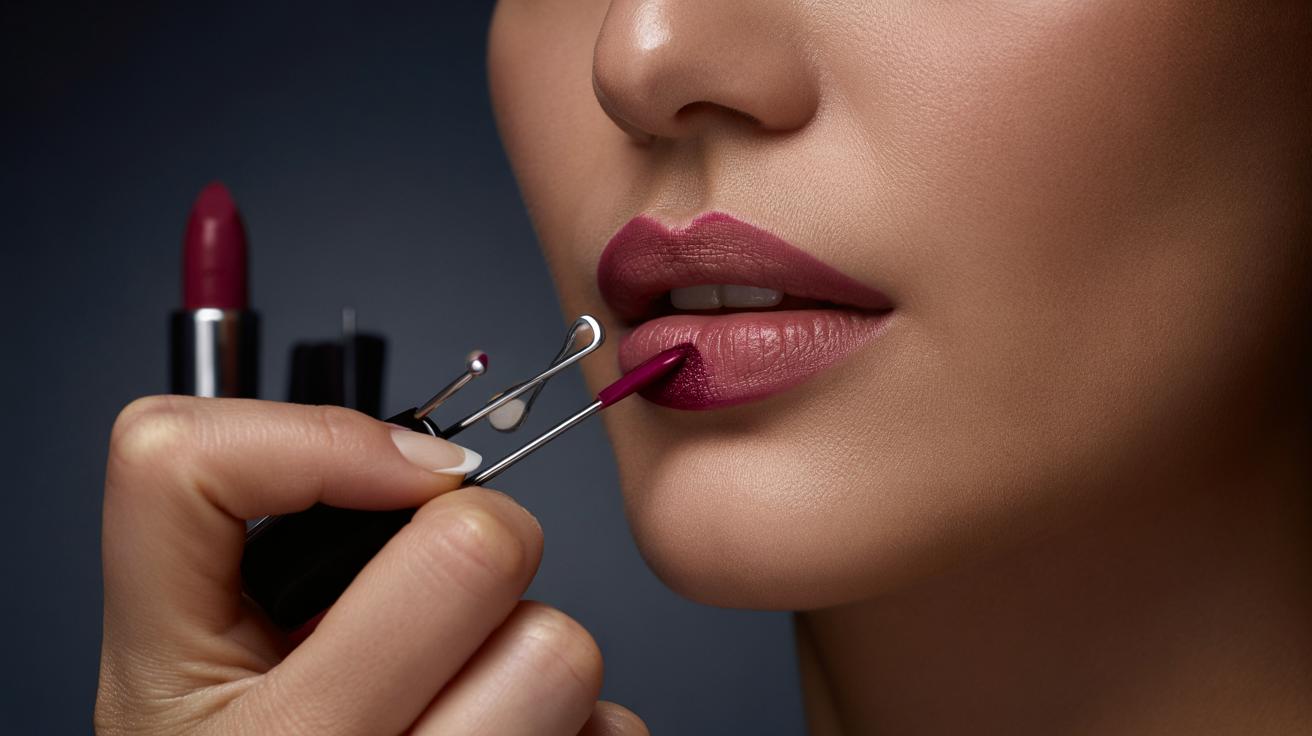
Scroll through any beauty feed and you’ll see it: the softly diffused mouth that looks plush yet precise. Beauty experts now insist there’s a brilliantly low-tech way to nail it every time—apply lipstick with a humble bobby pin. By using the pin as a tiny stamper, you place pigment exactly where the gradient should deepen, then blend outward for a flawless ombre lip in minutes. Artists I’ve spoken to in London say the trick outperforms bulky applicators when symmetry matters. A clean tool and a light touch beat an expensive product used heavily. Below, I break down why this works, how to execute it step by step, the shades that always blend, and the hygiene rules professionals follow.
Why a Bobby Pin Works for Ombre Precision
The secret is control. A bobby pin’s rounded tips behave like micro-stamps, letting you press a denser colour only into the inner third of the lips and the depths of the cupid’s bow. That strategic placement creates the shadow that makes an ombre read naturally, echoing the way real lips carry depth. Traditional applicators deposit too much product across too wide an area; fingers blur edges too quickly. The pin’s tiny contact points mean minimal product, maximal intention, which keeps the gradient believable rather than blocky. Precision, not pressure, is what builds that cloud-soft fade.
There’s also symmetry. The U-shape helps you mirror both peaks of the cupid’s bow, guiding a balanced top lip in seconds. Because the tool is rigid, you avoid the wobble that turns crisp shading into a smudge. It’s portable, costs pennies, and reduces waste from disposable applicators. Used correctly, the pin becomes a reliable workaround for those who struggle with overlining or patchy inner corners—especially on deeper shades where streaks show. The result is a tidy gradient that survives coffee breaks and quick retouches.
Step-by-Step Method Backed by Makeup Artists
1) Prep by smoothing with a gentle scrub and a thin balm, then blot. 2) Conceal just outside the lip line to neutralise redness. 3) Define softly with a neutral liner close to your natural lip tone, keeping edges feather-light. 4) Load the bobby pin tips with a deeper lipstick or pencil—wipe excess. 5) Stamp the colour at the centre of the upper and lower lips, plus the cupid’s bow. Place colour only where your lips naturally cast shadow. 6) Using a clean finger or brush, tap outward to diffuse, stopping two millimetres before the line.
7) Press lips together once to marry the centre tones, then add a sheer or satin lighter shade to the outer thirds, tapping inward so the join disappears. 8) For extra depth, re-stamp the inner centre with the bobby pin, then blur. 9) Set edges with a trace of translucent powder or a whisper of concealer on a brush. 10) Optional: gloss only in the centre for volume. Never drag the metal edge—stamp and lift to protect the skin. This routine typically takes under three minutes after a single practice session.
Shade Pairings and Finishes That Always Blend
The trick sings when the contrast is thoughtful rather than stark. Pick a centre shade one to two tones deeper than your base, in the same undertone family. Cream or satin formulas blend most forgivingly; mattes can work if you add slip with balm first. Below is a quick guide that UK artists recommend for everyday harmony across undertones.
| Base/Edge Shade | Centre (Deeper) Shade | Finish Tip |
|---|---|---|
| Rose nude | Berry or mulberry | Use satin centre, soft-matte edge |
| Terracotta | Brick red | Balmy layer before stamping |
| Mauve | Plum | Light gloss dab in the middle |
| Peach | Burnt orange | Sheer outer layer for seamless fade |
| Caramel | Espresso | Feather liner matches natural lip |
Keep undertones aligned—cool with cool, warm with warm—to avoid a muddy merge. If you prefer drama, increase depth only at the very centre and keep the outer two thirds airy. Less pigment spread equals more believable volume. A final press with a tissue ensures longevity without dulling the gradient. For night, add sparkle by tapping a tiny highlighter just above the cupid’s bow.
Hygiene, Safety, and Sustainability Notes
Start with a new or visibly clean bobby pin. Wash in warm soapy water, dry thoroughly, then wipe with isopropyl alcohol; let it evaporate before contact. Never use a rusted or chipped pin on lips. If your pin lacks rounded tips, cushion them with a sliver of tissue or a silicone micro cover to avoid scratching. Load colour directly from the lipstick bullet for personal use, or scrape a pea-sized amount onto a palette for shared kits to prevent contamination.
When stamping, hold the pin lightly and work in tiny increments; heavy pressure leaves dents and uneven patches. For sensitive skin, choose creamy, fragrance-free formulas that glide without tugging. Dispose of bent pins rather than trying to reshape them—they can snag. Sustainability-wise, this method cuts reliance on disposable cotton buds and single-use applicators, while keeping your routine compact. A multiuse tool that’s cleaned and stored properly is kinder to both your lips and your makeup bag.
From studio sets to bathroom mirrors, the bobby pin method wins because it reduces guesswork and amplifies precision. It lets you sculpt believable depth with minimal product, showcase your natural lip shape, and switch undertones with the seasons. What begins as a hack quickly becomes a habit: stamp, blend, and stop before you overwork the fade. If you’ve struggled with harsh lines or centre patches, consider this your small-but-mighty reset. Which shade pairings are you most keen to try first, and how will you adapt the technique to your signature finish?
Did you like it?4.5/5 (23)